
You’ve decided you want an in-ground irrigation system. Maybe you’re tired of dragging hoses around on hot July evenings. Maybe you’ve watched a new lawn investment slowly go brown during a dry August. Maybe you’re just ready to stop thinking about watering altogether.
Whatever brought you here, there’s a question nearly every homeowner asks before they commit: What actually happens during a sprinkler system installation?
It’s a fair thing to wonder about. After all, it involves digging up your lawn, routing pipes under your property, and connecting to your water supply. For most people, it’s unfamiliar territory — and the unknown tends to feel bigger than it is.
The good news: a professional in-ground sprinkler installation is a well-organized, one-day process for most residential properties. There’s no mystery to it. Here’s exactly what happens, from the first call to the final walkthrough.
A professional sprinkler system installation typically follows five main stages:
For most residential properties in Burlington, Oakville, Mississauga, and Hamilton, the full installation is completed in a single day by a trained crew. Your lawn may show minor trace lines from trenching, but these typically fade within a few weeks.
Before a single trench is dug, a good irrigation installer spends time understanding your property — not just measuring it.
At Nutri-Lawn Burlington Irrigation, every installation begins with a thorough on-site consultation. This isn’t a five-minute walkthrough. Our team evaluates your property’s layout, soil type, slope, sun exposure, existing landscaping, and water pressure. We look at which areas are turf, which are planting beds, and where shaded zones might need less water than full-sun areas.
Why does this matter? Because a sprinkler system that ignores these variables will either overwater some areas, underwater others, or both. Efficient irrigation isn’t about covering every square metre with the same amount of water — it’s about delivering the right amount to the right place at the right time.
This assessment informs the custom system design: how many zones the system will have, where each valve will be located, what types of sprinkler heads are appropriate for different areas, and where the controller will be installed. Lawn areas typically use pop-up rotary or spray heads; garden beds and shrub areas often call for drip emitters or lower-volume heads.
The result of this consultation is a tailored irrigation plan for your specific property — not a template applied from the last job.
If you’re still deciding whether an in-ground system is the right investment for your property, our guide on whether an irrigation system is right for your property is a good place to start.

Before any digging begins, underground utilities must be located and marked. This is not optional — it’s a required safety step under Ontario regulations.
In Ontario, all contractors are required to contact Ontario One Call (ON1CALL) before excavating. This service coordinates with utility companies — gas, hydro, telecommunications, water, and sewer — to have underground infrastructure marked on your property. Once marks are in place, our crew knows exactly where they can and cannot dig.
This step protects you, our crew, and your property. A ruptured gas line or severed electrical conduit isn’t just an inconvenience — it’s a serious safety hazard and an expensive repair. Reputable irrigation installers will never skip this step.
The locate process typically takes a few business days, which is part of why scheduling your installation in advance (rather than calling in May when everyone else is calling) is a good idea. According to Ontario One Call, excavators are required to wait at least three business days after submitting a locate request before beginning work.

With locates complete and the system design finalized, installation day begins.
The crew arrives with a trenching machine, which cuts narrow channels through your lawn — typically around 15–20 cm deep — following the designed layout of your system’s mainline and zone pipes. Modern trenching equipment is precise and minimally disruptive. The cut is narrow, and the excavated soil is set aside to be backfilled immediately after pipe installation.
The mainline is the primary supply pipe that runs from your home’s water connection point to the valve manifold — the central hub of the system. From there, individual zone pipes branch out to each irrigation zone across your property.
Pipe material is typically schedule 40 PVC or flexible poly pipe, chosen based on the installation requirements of your property. Fittings are installed at every junction, change of direction, and branch point to ensure a watertight system.
Once pipe is laid, the trenches are backfilled and compacted. The crew takes care to restore the surface as closely as possible to its original state. You’ll likely see faint lines in your lawn where the trenches were — these are normal and typically become invisible within a few weeks as the turf re-establishes.
With the underground infrastructure in place, the above- and at-grade components are installed.
The valve manifold is the control centre for your system’s zones. Each zone — front lawn, backyard turf, garden beds, side yards — has a dedicated valve that opens and closes on command from the controller. The manifold is typically installed in a protective valve box buried at grade, or in a utility area near your home’s water connection.
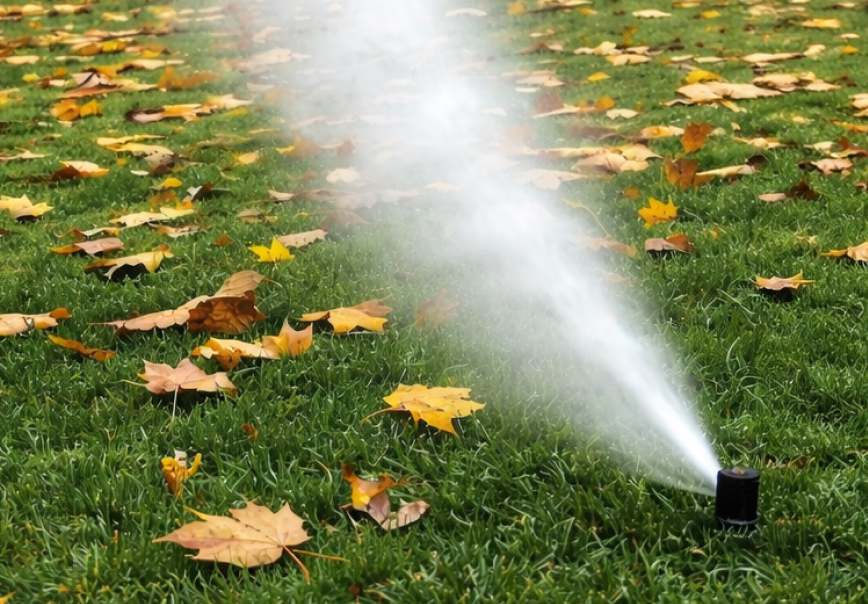
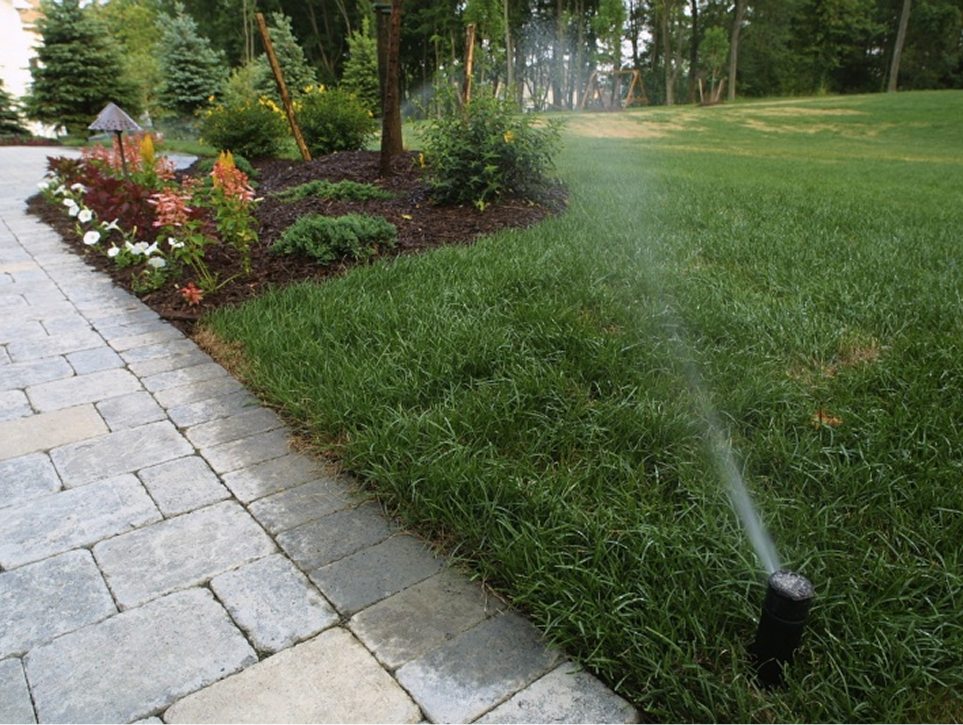
Sprinkler heads are installed throughout each zone according to the design plan. Pop-up spray heads are standard for turf areas, rising above the grass surface when activated and retracting flush with the ground when the zone shuts off. Rotary heads cover larger areas with rotating streams. Drip emitters are used for garden beds and plantings where targeted, low-volume watering is preferable to overhead spray.
Head spacing is critical — proper overlap ensures complete coverage without creating dry spots or wasteful overwatered areas. Our team uses industry-trusted components from brands like Hunter, Rain Bird, and Toro, which are known for durability, consistent performance, and compatibility with modern smart controllers.
Backflow prevention is a critical component that deserves a mention here. An irrigation system connects to your home’s potable water supply, which creates a potential risk of contaminated water flowing back into the supply line under certain pressure conditions. A properly installed backflow preventer eliminates this risk. In many Ontario municipalities, a backflow prevention device is required by local bylaws, and annual backflow testing may also be mandated. Nutri-Lawn Burlington Irrigation installs compliant backflow prevention devices on every new system as a standard practice.

The irrigation controller — sometimes called a timer — is the brain of your system. It’s what allows your irrigation to run automatically, on a schedule you set, without you having to think about it.
Controllers are typically installed inside your garage, basement, or utility room, with a wire run to the valve manifold outside. The controller connects to each zone valve and signals them to open and close according to the programmed schedule.
Modern irrigation systems increasingly use smart controllers, which go significantly beyond basic timer functionality. A SMART irrigation controller connects to local weather data and adjusts your watering schedule automatically — skipping a cycle when rain is forecast, reducing runtime during cool periods, and compensating for dry spells. Over a season, this kind of adaptive watering can meaningfully reduce water consumption compared to a fixed timer schedule.
According to Environment and Climate Change Canada, outdoor water use — primarily lawn and garden irrigation — accounts for a significant share of residential water consumption during summer months. Smart controllers are one of the most effective tools for reducing that figure while keeping your landscape healthy.
After installation, every zone is test-run while our technician walks the property. Head-by-head, we check for proper arc, radius, and coverage. Any adjustments to head position or arc setting are made on the spot. The controller is programmed with an initial watering schedule appropriate for the season, and we walk you through how to use it — adjusting run times, setting rain delays, and navigating the interface.
A sprinkler system isn’t a set-it-and-forget-it investment — it needs seasonal attention to perform well and last for years. Here’s what the annual service cycle looks like:
Spring start-up: Each spring, your system needs to be pressurized and inspected after winter. Our seasonal irrigation services include opening the system, checking every zone for proper operation, inspecting heads for damage, and adjusting coverage as needed. This is also when we verify your backflow device is functioning correctly.
Mid-season inspection: A mid-summer check is an opportunity to fine-tune run times, address any heads that have shifted or been damaged by mowers or foot traffic, and make sure coverage remains optimal as seasonal conditions change.
Fall winterization: This is the most critical seasonal service. Before the first hard frost, the system must be blown out with compressed air to remove all water from the pipes, valves, and heads. Water left in an irrigation system through a Canadian winter will freeze and expand, cracking pipes, splitting valve bodies, and destroying heads. A professional sprinkler system winterization is not a DIY job — it requires commercial-grade compressors and a technician who knows how to properly cycle through each zone.
One of the most common concerns homeowners have is how their yard will look when the crew packs up and leaves.
Here’s the honest answer: you’ll see evidence that work happened. The trench lines will be visible as slight depressions or colour variation across your lawn. Near the valve boxes and any access points, the disturbed soil will be more obvious. This is normal and temporary.
Within a few weeks — with regular watering, ideally from your new system — the turf fills back in and the trench lines fade into the surrounding lawn. By mid-summer, most homeowners can’t identify where the trenches were.
The installation crew backfills and tampers all trenches and restores the surface to the best condition possible given the work involved. We treat your property with the same care we’d want shown to our own.
Irrigation isn’t the same everywhere. The soil conditions in Burlington’s mature neighbourhoods behave differently from the clay-heavy lots in newer Hamilton subdivisions. Oakville properties with significant grade changes need different zone design than a flat Mississauga residential lot. Water pressure varies by neighbourhood and municipality, and local watering bylaws differ across the Halton Region, Hamilton, and Peel.
Nutri-Lawn Burlington Irrigation has been designing and installing irrigation systems across Burlington, Oakville, Mississauga, and Hamilton for over 30 years. That experience isn’t just a number — it’s the kind of local knowledge that shows up in system designs that actually work in real Ontario conditions, not just on paper.
We’re members of Landscape Ontario, the professional association for the horticulture industry in this province, and we hold ourselves to those professional standards on every job.
You’ve seen the whole process. Now you know there’s nothing mysterious about it — just a well-organized day of professional work that results in a system designed specifically for your property.
Nutri-Lawn Burlington Irrigation has been installing sprinkler systems across Burlington, Oakville, Mississauga, Hamilton, and the surrounding Halton Region for over 30 years. Every system we install is custom designed for the property it’s on, built with quality components, and backed by a team that’s here for the long term — from your first spring start-up to your annual fall winterization, year after year.
Request a consultation today and find out what the right system looks like for your property. Our team will walk your site, answer your questions, and provide a clear, detailed quote — no pressure, no guesswork.
Call us at 905-632-2445 or reach us by email at irrigation@nutrilawnburlington.com. We’d be glad to help.
